Saturday, November 23, 2013

A Mission to Android -- Creating the Layout

Welcome back to my blog on my journey to my own clock widget. Writing this post about layouts and resources was way more difficult then I anticipated. Resource handling and internationalization and localization (i18n and l8n) are such broad topics that I can barely scratch the surface of it all in a single post. Still I hope that I can give you a small inside into the process. So lets dive into today's post and talk about the layout.

Overview

Today I will explain the layout and along the way talk a bit about how android handles resources like images and strings. Further I will try to show how the declarative approach allows to define different resources depending on the country, the screen size and many more things. After this post you should be able to create your own layouts for different languages and screen sizes and understand how to interact with your layout from code.

Resource Selectors

The android world consists of many different devices with different screen densities, sizes and memory footprint. Further more if you release an app into this ecosystem and you want to compete on a global market with hundreds of different languages and type faces you need a way to define your UIs in a way that allows to compensate for these different configurations to bring the best user experience to your app. In android this is realized by externalizing resources like strings, dimensions, images, animation, etc. into separate files and providing mechanisms to select them based on qualifiers defining the different configurations.

Android distinguishes between default and alternative resources. Default resources are either device independent or represent the least common denominator for all platforms. Alternative resources are grouped according to the specific configuration they are designed for. When a resource is requested from the OS it is looked up in the folder with the most specific matching configuration falling back to the lesser specific once. If no match is found the default resource is used.

Resources are put under the res folder in one of the sub folders depending on the type of the resource:

  • layouts go into the layout sub folder
  • the values subfolder takes strings, colors and dimension files
  • the menu sub folder takes menu definitions
  • drawable takes image resources
  • the xml sub folder takes arbitrary xml files containing meta data like app widget provider meta data
For a complete listing of known subfolders take a look at Providing Resources|Android Developers.

To specify a configuration a qualifier designating the configuration is appended with a hyphen to the folder name: <folder name>-<qualifier>. Qualifiers can be composed to create more specific configuration. Android always selects the most specific configuration based on the context of the used resource. A complete list of available qualifiers can be found in table 2 at Providing Resources|Android Developers. The order in which the qualifiers are composed has to correspond to the order they are given in the table or else Android will ignore the given folder. You will see the usage of qualifiers in the context of using image resources.

A special case for the use of the qualifiers is internationalization (I18N) and localisation (L10N). I18N and L10N is realized by appending the country code and/or the language code to the values sub folder. I will give an example in the "Defining Text" section on their usage.

The Layout

Layouts

As android has to support many different screen densities and sizes it is essential that the layout system can adapt. For this purpose android provides a predefined set of Layouts. These are exposed either through code or in the form of xml tags. The xml tags are inflated to the corresponding classes before display. No matter how you define the layout it is the job of the layout to adapt its elements to the screen. Depending on the layout the strategy for this adaption is different.

Layouts can be nested to produce more complex layouts but be careful the more complex the hierarchy gets the longer it takes android to display it. Always try to keep the hierarchy as flat as possible to improve performance and keep your UI responsive.

Some of the layouts available are

  • LinearLayout - displays its content as a horizontal or vertical single row
  • GridLayout - displays its content in a grid
  • FrameLayout - displays its content a single frame with predefined anchor points. This layout is intended to display only one child but it can be used to stack children on top of each other.
  • RelativeLayout - displays its content in accordance to their relative layout declarations.
The layout of the widget UI is defined declarative in a xml file. Although you can create a view completely in code the android way of doing things is doing it declarative using layouts. Don't worry you can interact with the view during inflation and, as you will see, only change the necessary parts in code.

The xml file contains the used layout as the top element and the child elements that make up your screen. For now I will simply define one layout and size it in a way so that it works on the screen of a Nexus 4. (The Nexus 4 has a 4,7" display with a pixel density of 320dpi)

The first thing to decide is which layout to use for the UI. As I'm planning a complex UI with elements that overlay on top of each others I either have to use a frame layout or a relative layout. I chose the relative layout which allows me to position individual elements in relation to each other making it unnecessary to use nested layouts while giving me complete control over each element's position. The disadvantage of this approach is that I have to specify the sizes so that the overlay works properly.

To make things easy I start with just the analog clock element added to the layout. The analog clock element provides the means to show a completely functional analog clock with customized hours, minutes arms and a custom dial. If not specified android uses the system default drawable resources for minute, hand and dial.

<?xml version="1.0" encoding="utf-8"?>
<RelativeLayout xmlns:android="http://schemas.android.com/apk/res/android"
    android:layout_width="match_parent" 
    android:layout_height="wrap_content">
    
    <TextView
        android:id="@+id/clockLabel"
        android:layout_width="wrap_content"
        android:layout_height="wrap_content"
        android:layout_alignParentTop="true"
        android:layout_alignParentLeft="true"
        android:text="@string/clock_label" />

    <AnalogClock
        android:id="@+id/analogClock"
        android:layout_width="@dimen/analogclock_layout_width"
        android:layout_height="@dimen/analogclock_layout_height"
        android:layout_alignParentLeft="true"
        android:layout_below="@+id/clockLabel"
        android:dial="@drawable/dial"
        android:hand_hour="@drawable/hour_hand"
        android:hand_minute="@drawable/minute_hand"
        android:paddingLeft="1dp" />    

</RelativeLayout>

The above layout positions label along the top edge of the layout (line 12) the analog clock below the clock label (line 19) and aligning the label and the clock element with the parent element (line 11,18) resulting in the schematic layout:

When the layout is resized the elements keep their relative position and grow according to their width and height. If the elements do not fit into the current layout size then the layout is cropped. The definition of the different elements is read from top to bottom. Elements that overlap are drawn on top off each other according to this order.

Besides its relative position each element has a margin and a padding which are considered during positioning and added to the space the element occupies.

The following box model shows the different positioning attributes that can be specified for each element.

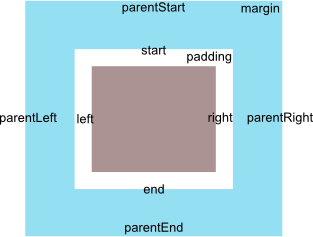
You can either specify a relative position like android:layout_toLeftOf="@id/...", android:layout_toEndOf="@id/..." or you can align the edges of the elements using android:layout_alignBottom="@id/..." or android:layout_alignStart="@id/...". You can also specify whether the element should align with the edges of the parent android:layout_alignParentTop="true". For a complete list of possible attributes read RelativeLayout.LayoutParams|Android Developers.

Providing Image Resources

Since I do not want a standard clock I exported my design of the hour, minute and dial from my SVG file and added them to the platform as drawable resources. To do this you simply copy the images, preferrebly as pngs, into one of the drawable sub-folder. The drawable can then be referenced in the layout by prefixing its name with @drawable/ in the src attribute.

<AnalogClock
        android:id="@+id/analogClock"
        android:layout_width="@dimen/analogclock_layout_width"
        android:layout_height="@dimen/analogclock_layout_height"
        android:layout_alignParentLeft="true"
        android:layout_below="@+id/clockLabel"
        android:dial="@drawable/dial"
        android:hand_hour="@drawable/hour_hand"
        android:hand_minute="@drawable/minute_hand"
        android:paddingLeft="1dp" />    

It is also possible to reference the drawable from code. Android generates a static id named according to the image file name in the drawable section of the R file. This id can then be used to maniuplate the image in code.

Example showing how to set a image using a resource id

ImageView imageView = ...;
imageView.setImageResource(R.drawable.dial);
This code snippet will pick the image named dial.png and add it to the imageView.

The R File

Android generates ids for all resources so that they can be referenced easily in code. These ids are put in the R file which provides static fields for each resources in a namespace representing the resource type.

The res file structure:

res/
 |-- layout/
 |    |- clock_layout.xml
 |
 |-- drawable/
 |    |- dial.png 
 |    |- hours.png
 |     
 |-- values/
 |    |- string.xml 
 |    |   |-> contains key:
 |    |         clock_label 
 |    |
 |    |- dimen.xml 
          |-> contains key: 
                clock_width, 
                clock_height

will result in the following R file:

public final class R {
    public static final class attr {
    }
    public static final class dimen {
        public static final int clock_height=0x7f050000;
        public static final int clock_width=0x7f050001;
    }
    public static final class drawable {
        public static final int dial=0x7f020000;
        public static final int hour=0x7f020001;
    }
    public static final class id {
        public static final int analogClock=0x7f080001;
        public static final int clockLabel=0x7f080000;
    }
    public static final class layout {
        public static final int clock_layout=0x7f030000;
    }
    public static final class string {
        public static final int clock_label=0x7f060002;
    }
    public static final class style {
        // ... 
    }
    public static final class xml {
        // ... 
    }
}

Supporting different Screen Sizes

Which drawable is loaded depends on the screen metrics of your device and the available resource selectors. Android will try to find the best match and scale it appropriately. Depending on which version of the SDK you are using you have different possibilities to provide the qualifiers for your drawable resources.

  • drawable-ldpi designates a low density screen with 120dpi. This attribute was introduced in SDK Level 4.
  • drawable-mdpi designates a medium density screen with 160dpi. This attribute was introduced in SDK Level 4.
  • drawable-hdpi designates a high denisity screen with 240dpi. This attribute was introduced in SDK Level 4.
  • drawable-xhdpi designates a very high denisity screen with 320 dpi. This attribute was introduced in SDK Level 9.
  • drawable-xxhdpi designates screen densities with 480dpi. This attribute was introduced in SDK Level 16.
  • drawable-xxxhdpi designates screen densities with 640dpi. This attribute was introduced in SDK Level 18.
  • drawable-nodpi non scalable
  • drawable-tvdpi from SDK Level 13 213dpi. This attribute was introduced with SDK Level 13.
each of the qualifier defines a standard screen size for known android devices. When you request a drawable android finds the best match and scales the drawable to the actual size. The scaling factor of ldpi:mdpi:hdpi:xhdpi is 3:4:6:8. Providing appropriately scaled images prevents scaling artifacts in the UI. The problem with this approach is that with tablets and the new 5" and 7" displays the categories do not always scale properly. To fix this android added new qualifiers with SDK level 13 to enable the definition of folders for all sorts of screen sizes.
  • drawable-h<height>dp height of the screen in dp
  • drawable-w<width>dp width of the screen in dp
  • drawable-sw<height>dp the size of the shortest screen width in dp
The new qualifiers define the width (w), height (h) or the shortest screen size (sw) of the screen in dp allowing to specify a concrete size for which the image is optimized. As a fallback you simply put a default image in the drawable folder if no qualifiers matches android will simply pick the image defined there.

Example file structure

|-drawable
|   |- test.png
|
|-drawable-w820dp
|   |- test.png
|
|-drawable-h240dp
    |- test.png

Defining Dimensions

The clock should have a certain height and width. I can specify this directly in my layout file but this would mean if I have to support other layouts where the height might have to change I have to provide an alternative layout file which only differs in the dimension of the analog clock. To make it possible to reuse the layout structure we defer the dimension declaration into the dimension resource which can then be provided for different layouts countries etc. This allows me to separate the structure of the UI from the actual dimensions.

<resources>
    <dimen name="analogclock_layout_width">120dp</dimen>
    <dimen name="analogclock_layout_height">120dp</dimen>
</resources>

To reference the dimension in your layout you simply use the prefix @dimen/ and specify the name of the dimension to use.

<AnalogClock
        android:id="@+id/analogClock"
        android:layout_width="@dimen/analogclock_layout_width"
        android:layout_height="@dimen/analogclock_layout_height"
        android:layout_alignParentLeft="true"
        android:layout_below="@+id/clockLabel"
        android:dial="@drawable/dial"
        android:hand_hour="@drawable/hour_hand"
        android:hand_minute="@drawable/minute_hand"
        android:paddingLeft="1dp" />    

When specifying dimensions always try to be pixel independent. To ease this android provides device independent pixels dp for specifying pixel sizes and scalable points sp for specifying text sizes in a screen independent way. You might also see dip as the unit for device independent pixel but the preferred way is to use dp. dp and sp are always calculated relative to the actual pixel size so that the final dimensions remain the same relative to each other. On a high density display the actual size of 1dp can be 2.5px or 3px while on a low density device the same 1dp equals 1px. The android documentation says that on a 160dpi device 1dp = 1px. Always keep this in mind when designing your UIs and make your UI adaptive to different screen sizes to cover a broad range of devices.

Be careful when checking the design on the emulator the actual screen always looks slightly different from the emulator due to the scaling factor on the emulator in relation to the screen of your development machine. As an example the text size on my actual phone looks slightly smaller then on the emulator making some of my text sizes too small on the real device.

Defining Text

Just as dimension are extracted into a separate file so are strings used in the layout. This allows to overwrite the strings for different languages without having to provide a language specific layout. For the current state of my widget I have provided the following string.xml file.

<?xml version="1.0" encoding="utf-8"?>
<resources>
    <string name="app_name">E34Clock</string>
    <string name="clock_label">Current Time is:</string>
</resources>
These labels are applied in the layout by referencing the corresponding string resource by its name prefixed by @string/.
<TextView
        android:id="@+id/clockLabel"
        android:layout_width="wrap_content"
        android:layout_height="wrap_content"
        android:layout_alignParentTop="true"
        android:layout_alignParentLeft="true"
        android:text="@string/clock_label" />
To provide a translation for the strings I simply have to provide a new resource folder with the appropriate ISO 639-2 language code attached with a hyphen. Since I'm providing a German translation I have to append the language code de to the folder name: values-de. I then simply add the string.xml file to this folder and translate all necessary values.
<?xml version="1.0" encoding="utf-8"?>
<resources>
    <string name="clock_label">Die aktuelle Uhrzeit ist:</string>
</resources>

When android inflates the layout it will try to find the best matching strings.xml and use its values. In case there is no specific folder it falls back to the default which in this case contains the English translation. This way I can internationalize my application by simply providing different strings.xml for the different language.

We can expand on this to incorporate L10N. For this we have to append the qualifier <r3166-alpha-2 ISO Region Code> to the folder name. Lets assume we want to provide a currency value for the United States, the United Kingdom, Germany and Switzerland. First we define the default strings.xml which in this case would be for Germany.

<?xml version="1.0" encoding="utf-8"?>
<resources>
    <string name="currency">100,00€ (EUR)</string>
</resources>
We can then localize this by specifying the folder for each country and providing the appropriate content for currency.
 |- values-rDE
 |    |- currency = 100,00€ (EUR)
 |
 |- values-rUS
 |    |- currency = $134.70 (USD)
 |
 |- values-rGB
 |    |- currency = £83.38 (GBP)
 | 
 |- values-rCH
      |- currency = 123,21 SFr (CHF)

When necessary you can combine these qualifiers to specify localized translated values.

 |- values-en
 |     |- english translations
 |
 |- values-en-rUS
       |- english translations specific to the United States of America

Summary

The resource selection mechanism allows to specify different layouts for different orientations, screen sizes and languages. By separating the different aspects, - layout, text, dimensions, etc... - you can customize only the necessary parts of your UI. Although I have not shown it it is possible to use this for other resources (e.g. colors, menus) as well. You are not limited to using the selectors in layouts you can also refer to the resources in your code using the ids generated in the R file. All this together provides a powerful mechanism to publish your app for all android devices out there.

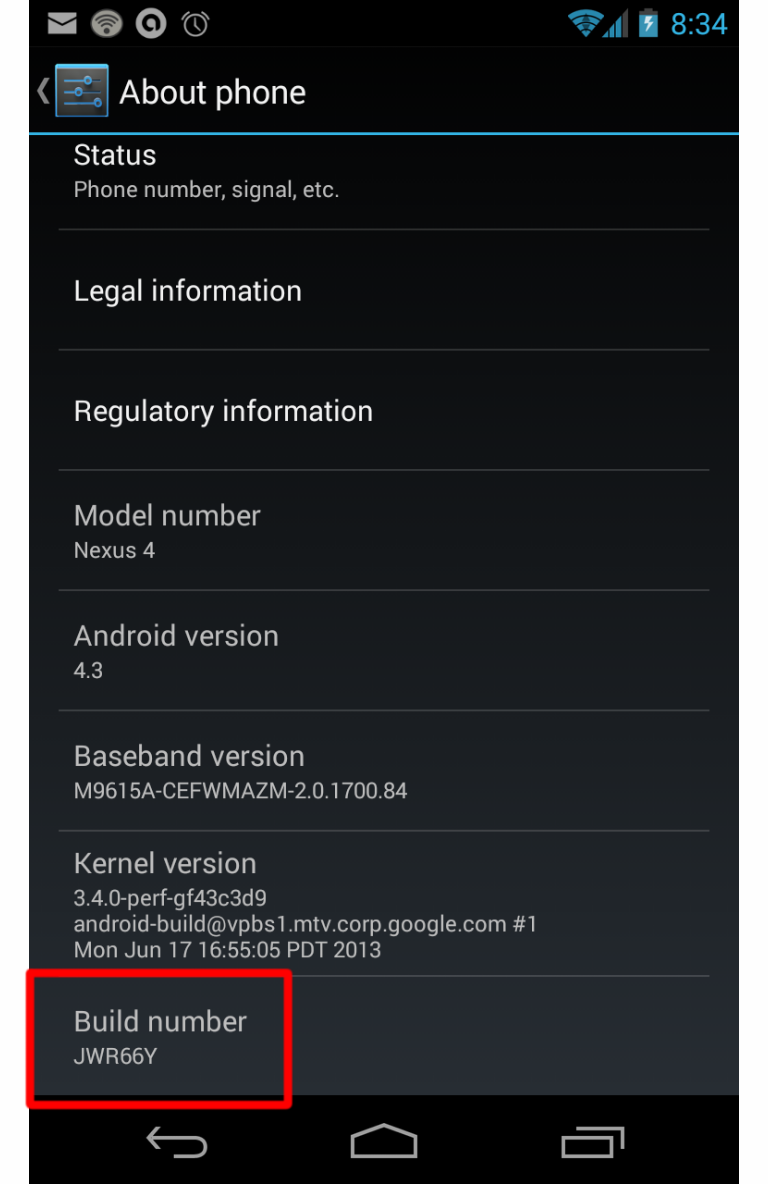
Running the represented code available from the FirstStep branch on Github results in

I hope you enjoyed this post and learned some stuff along the way. If you find any errors leave a comment or if you have questions just ask them. I would also appreciate it if you just give me some feedback in the comment section.

Outlook

Next post I will explain how we enable the widget in android and which meta data is necessary to activate the widget.

Resources

Yours truely

Stefan Langer

Creative Commons License

Thursday, November 14, 2013

Mission to Android - Tools and Helpers

Today I would like to take a short break from writing about coding and talk a bit about some tools I have come across to ease the life of android developers and designers. I would be more then happy if you guys could give some more tips and tricks and add to this list of tools.

Faster Emulater

When I first started developing on android the most frustrating factor was the poor performance of the emulator. If you are not capable to debug and develop on the real device you are in for some frustrating moments. Just read my blog post on the topic if you want to hear my rant. Anyway +Zachary Dreeman suggested to try out Genymotion. I did and I must say the performance boost is magnificent. Genymotion provides a Android test system on a virtual box image with some additional tools for simulating battery status, GPS, etc ... After installing the tooling itself you need to download the images and can then start them. After the vm starts up, which takes a minute or two, it is quick and responsive. Currently there are only downloadable images up to Android 4.2.2. But considering the much better performance compared to the stock emulator it is well worth the effort and since it is open source it should only be a matter of time until somebody provides more images.

Layout Grid

Android provides some nice debugging options to help you in designing your UI. One of them is the ability to show all layout boundaries. To enable this setting first turn on the developer options on your device by pressing several times on the build number in the About phone section in the settings. This will make the developer options appear in the settings and there you can check the "Show layout bounds" section.

The problem is once you see the layout boundaries it tends to be tedious to fix layout issues by changing dimension, recompiling and deploying to update the app. Wouldn't it be nice to have a grid of a predetermined size in order to have some clue on the dimensions of things. Well I stumbled across GridWichterle in a G+ post.

It is a simple app which allows you to overlay a grid over your app to show how your elements align. The distance of a grid element can be configured in dp and the color of the grid can be changed. The app seems simple but I found it of great help to have this grid to see how elements align and to have a measurement of how big elements have to be.

Summary

Now I'm waiting for your list of tools which ease development and design. I will try to give a follow up post with a compiled list of all the cool tools you add to this list. I'm eager to hear from you...

Yours truely

Stefan Langer

Creative Commons License

Thursday, October 31, 2013

A Mission to Android - Creating a Widget

So my mission continues and it's time to get my hands dirty and start coding the widget. I think everybody knows that a widget is a small program which can be placed on the home or the lock screen. A widget can show information or provide functions to interact with the system. To summarize a widget is just another means to interact with an app running in the background.

Overview

In today's post I will create the base class for my widget. During this post I hope to give you some inside on how a widget provider works and how it interacts with the android system. You will see how a view is prepared for display in a widget and on a side note you will get an overview into the log system of android.

Coding the AppWidgetProvider

Widget Lifecycle

  1. Widget is added for the first time to an AppWidgetHost like the home or lock screen. This is the time to allocate resources and start services needed for the operation of the widget.
  2. Widget needs to be updated or a new instance of the widget is added to an AppWidgetHost. This method is not called on the first addition of a widget instance. So make sure that any preparation for layouting is also done in the onEnabled() method.
  3. Widget is removed from an AppWidgetHost.
  4. Last instance of a widget is removed from an AppWidgetHost and the AppWidgetProvider is no longer needed. This is the right time to cleanup resources and stop any sticky services.
  5. Called when the widget is displayed or when it is resized. This is where you should calculate sizes and adjust views accordingly. Only available in API level 16 and higher.

All widgets are specialized broadcast receivers which execute stuff depending on special intents they receive from Android. Some of these intents are ACTION_APPWIDGET_UPDATE, ACTION_APPWIDGET_DELETED, ACTION_APPWIDGET_ENABLED, ACTION_APPWIDGET_DISABLED and more. You can get an overview taking a look at the AppWidgetManager documentation.

To ease creation and handling of widgets android provides a specialized class AppWidgetProvider which extends BroadcastReceiver and provides methods to hook into the life cycle of a widget. All you have to do is extend it and implement the methods.
If you take a look at the sources for AppWidgetProvider you will see that all life cycle methods are called from within the onReceive method by handling intents send from the OS.

So here is the code for my widget

/*
 * (c) Copyright 2013 Stefan Langer
 *
 *    Licensed under the Apache License, Version 2.0 (the "License");
 *    you may not use this file except in compliance with the License.
 *    You may obtain a copy of the License at
 *
 *        http://www.apache.org/licenses/LICENSE-2.0
 *
 *    Unless required by applicable law or agreed to in writing, software
 *    distributed under the License is distributed on an "AS IS" BASIS,
 *    WITHOUT WARRANTIES OR CONDITIONS OF ANY KIND, either express or implied.
 *    See the License for the specific language governing permissions and
 *    limitations under the License.
 */

package de.element34.e34clock;

import android.appwidget.AppWidgetManager;
import android.appwidget.AppWidgetProvider;
import android.content.Context;
import android.util.Log;
import android.widget.RemoteViews;

public class E34ClockWidget extends AppWidgetProvider {
    private static final String TAG = "e34clock.E34ClockWidget";

    @Override
    public void onEnabled(Context context) {
        super.onEnabled(context);
        Log.d(TAG, "E34ClockWidget created!");
    }

    @Override
    public void onDisabled(Context context) {
        super.onDisabled(context);
        Log.d(TAG, "E34ClockWidget completely removed!");
    }

    @Override
    public void onDeleted(Context context, int[] appWidgetIds) {
        super.onDeleted(context, appWidgetIds);
        Log.d(TAG,"Deleting an instance of widget!");
    }

    @Override
    public void onUpdate(Context context, AppWidgetManager appWidgetManager, int[] appWidgetIds) {
        Log.d(TAG, "Updating widgets!");
        RemoteViews views = new RemoteViews(context.getPackageName(), R.layout.clock_layout);
        appWidgetManager.updateAppWidget(appWidgetIds, views);
        super.onUpdate(context, appWidgetManager, appWidgetIds);
    }
}

The code is pretty straight forward and doesn't do anything seriouse yet. First thing to notice is that we extend AppWidgetProvider and as discussed earlier this gives us a couple of methods to interact with the lifecycle of the widgets. Important to note here is that this class will not handle a specific instance of your widget but all instances. The idea is that all widgets will present the same state of the application so there is no need for individual control of a single widget.

When the first instance of your widget is created the OS calls the onEnabled method giving you the chance to setup any resources you may need to interact with the backend process. For each new instance being created or whenever your widget needs to be updated do to events in the OS the onUpdate method is called. When an instance is deleted from the home- or lockscreen the onDeleted method is called. When the last instance is deleted and the OS no longer needs to interact with your widget the onDisabled method is called giving you a chance to cleanup and release all resources.

For now I simply log a message using the log system from android. This is exposed through the static object Log.

The log system supports 5 log levels. The list shows the log levels in descending order from most verbose to least verbose. When the log level is set all log levels that are lower in the list are also included, e.g. when the level is INFO the levels WARN and ERROR are also printed.

  • VERBOSE - exposed through the v method
  • DEBUG - exposed through the d method
  • INFO - exposed via the i method
  • WARN - exposed via the w method
  • ERROR - exposed via the e method
Each log method is prefixed with a tag. This tag can later be used to filter the log and see only messages relevant to your code. The tag is a simple string. It does not imply any hierarchy in the log system as does the jdk or log4j logging system. The string is simply prefixed to the log message to ease grepping of log output. A good convention is to save the prefix in a static final variable and reuse this throughout the class. I use TAG throughout my code as the name for this variable.

For the widget to be able to display something I have to setup the initial view. The place to do this is in the onUpdate method as this gets called whenever the screen needs to be updated. Be aware that the onUpdate method is not called when the widget is first enabled. If you need to do view customization which divert from your layout you have to also call your update code from onEnabled.

    @Override
    public void onUpdate(Context context, AppWidgetManager appWidgetManager, int[] appWidgetIds) {
        Log.d(TAG, "Updating widgets!");
        RemoteViews views = new RemoteViews(context.getPackageName(), R.layout.clock_layout);
        appWidgetManager.updateAppWidget(appWidgetIds, views);
        super.onUpdate(context, appWidgetManager, appWidgetIds);
    }

RemoteViews

A class that describes a view hierarchy that can be displayed in another process. The hierarchy is inflated from a layout resource file, and this class provides some basic operations for modifying the content of the inflated hierarchy.

Unlike in an Activity I do not have direct access to the View instead I have to create an instance of RemoteViews. This RemoteViews reads the layout xml and inflates it into a view hierarchy. I then use the AppWidgetManager to dispatch the views to all instances of the widget. You can steer which widgets are updated by specifying only the ids of the widget to update. Each id represents one instance of the widget. In my code I always treat all instances the same way and update every single one.

Resources

You can find further and more detailed information about developing widgets at App Widgets | Android Developers. For widget design take a look at Widgets | Android Developers and for design guide lines got to App Widget Design Guidelines

Outlook

In the next post I will post about the layout for the widget and I will talk about how android handles resources like images, strings and dimensions.

As always if you have any feedback please leave a comment. If you found errors or stuff I should do differently please tell me as this is also an endeavor for me to learn android.

Yours truely

Stefan Langer

Creative Commons License

Wednesday, October 30, 2013

A Mission to Android - The Android Project

Over the past days I have started my mission to android. The goal creating a functional clock home screen widget. Last week I posted about my design and now that I have a plan it is time to get the idea realized in code. So the first thing I had to find out is how to create a widget in android.

I went through all sorts of different sources on the internet. Among others I read the guides on android developer, went through diverse tutorials and caught up on stuff that has happened since Ginger Bread , - my last try at developing for android-. As hours turned in to days I realized that I have lots of work ahead of me and so I decided to break up the steps and present them in steps that are hopefully easy to digest.

Overview

In this post I will go over how I setup the android project using Android Studio. I decided to use Android Studio even though it is still in an early release phase but since it is the future why not go for it. It seems to be stable enough for my purposes. So I downloaded the application and installed it on my development machines. This also downloads and installs a copy of the Android SDK. Once that was done I was ready to fire up Android Studio and create my project.

Creating an Android Project

Before I can actually create a widget I have to create a android project of which the widget is part of. The easiest way to get started is by simply using the "New Project" feature in Android Studio.

Now I have to choose the name for my project and the included module as well as the base package for the java code. I named my project and module E34Clock. I also have to choose the target and minimal Android SDK. For my project I decided to go with Ice Cream Sandwich as the minimal supported sdk. This corresponds to sdk level 14. The target of my application is level 18 which corresponds to Jelly Bean 4.3.3. Be careful which versions you choose because depending on this your app will have to run on different android versions and you might have to support multiple API calls due to version changes. This also impacts for which devices your app will be displayed in the app store later on.

Since I want to create widget I created a project that contained a single blank activity which I will later use for customizing of the widget.

In the last step I have to name the activity and the corresponding layouts.

Pressing "Finish" will create the typical android project structure and setup a gradle build system to build your app without needing an IDE.

The src/main/java/ folder holds all relevant classes for your app. The src/main/res/ folder holds all assets, images, xml files your application needs. We will get back to this when we start creating the application.

The most important file is the AndroidManifest.xml file. This file describes the join points of your app with the Android OS and the user.
Among other things you define your activities, services your receivers as well as the permissions your application needs. This file also tells Android which SDK version you support and which version your code is. I will come back to this file many times during the course of this journey.

<!--
  ~ (c) Copyright 2013 Stefan Langer
  ~
  ~    Licensed under the Apache License, Version 2.0 (the "License");
  ~    you may not use this file except in compliance with the License.
  ~    You may obtain a copy of the License at
  ~
  ~        http://www.apache.org/licenses/LICENSE-2.0
  ~
  ~    Unless required by applicable law or agreed to in writing, software
  ~    distributed under the License is distributed on an "AS IS" BASIS,
  ~    WITHOUT WARRANTIES OR CONDITIONS OF ANY KIND, either express or implied.
  ~    See the License for the specific language governing permissions and
  ~    limitations under the License.
  -->
<manifest android:versioncode="1" 
  android:versionname="1.0" 
  package="de.element34.e34clock" 
  xmlns:android="http://schemas.android.com/apk/res/android">

    <uses-sdk android:minsdkversion="14" 
      android:targetsdkversion="18"/>

    <application android:allowbackup="true" 
      android:icon="@drawable/ic_launcher" 
      android:label="@string/app_name" 
      android:theme="@style/AppTheme">
        <activity android:label="E34ClockSettings" 
          android:name=".ClockSettingsActivity">
          <intent-filter>
              <action android:name="android.intent.action.MAIN" />
              <category android:name="android.intent.category.LAUNCHER"/>
          </intent-filter>
        </activity>
    </application>
</manifest>

Since I created the project with a blank activity this activity is defined here.

    <application android:allowbackup="true" 
      android:icon="@drawable/ic_launcher" 
      android:label="@string/app_name" 
      android:theme="@style/AppTheme">
        <activity android:label="E34ClockSettings" 
          android:name=".ClockSettingsActivity">
          <intent-filter>
              <action android:name="android.intent.action.MAIN" />
              <category android:name="android.intent.category.LAUNCHER"/>
          </intent-filter>
        </activity>
    </application>

The activity consists of the name of the activity class and the label this activity is known by. The "." in front of the activity name tells Android to use the package named in the package attribute of the Manifest tag. Additionally we define an intent filter which defines on which intent we will react. For now we simply specify that the activity supports the MAIN action in the LAUNCHER category. This tells Android to include this activity in the app screen. When the displayed launcher icon is pressed it opens the activity. I will explain intents and intent-filters in detail when we comeback to them during coding of the widget.

Running this application by pressing the launcher icon gives you a simple blank activity which can be started but doesn't do anything.

Lookout

In the next post I will start creating the code for the widget. Hope to see you then.

Yours truely

Stefan Langer

Creative Commons License

Sunday, October 27, 2013

A Mission to Android - The Journey Begins


So I fired up my pencil and picked up a piece of paper and started drawing the layout of my widget. At first I had just the picture of an analog clock in my head. So I did some research. I picked up my phone and looked at the widgets I'm currently using. My main clock is from HD widgets and represents a digital clock. Further it indicates the current weather and shows me alarm time and battery level.
Since I liked it I had to incorporate this information into my own widget.
Next I took a look at the different clock widgets and status widgets on the play store. I took note of the things I liked and incorporated them into my draft.

Digitizing the Draft

Now that I knew what I wanted to achieve I fired up Inkscape and started transfering the paper draft into a digital form. Inkscape is an open source program to create Scalable Vector Graphics.

My first drafts


The current design


None of this is set in stone and I will most likely come back and redesign parts or all of it. 

Tips And Tricks   

Last and not least I want to tell you what has helped me to create my design.

  • Always start with pen and paper. I find it a lot easier to draft something on paper it helps to sort out your thoughts and the haptic of a pen and the feel of paper make it easier to be creative.
  • Use scalable vector graphics when designing iconic images or when the images you are creating are not too complicated. This will ease exporting different scaled graphics for use in different layouts. It also makes it easy to move things around and create alternative versions of the same thing.
  • Create alternative layouts to get a feel for your design. I often find alternative versions more interesting then my original idea.
  • Create a raster which gives you the scale of the screen you are designing for. This raster will help you later create the layout in code and make alignment easier. When creating the raster keep different rules in mind like Rule of Third or The Golden Ratio. Try to incorporate them into your design to get a pleasing look.
  • Make yourself a mask that resembles your screen and make that mask a multiple of the resolution you are targeting. I often find it nice to have a mask that has as the width a multiple of the dip (Device independent Pixels) of your target screen. This way you can simply read off sizeings and don't have to calculate them. Or calculation is a simple division without any floating values.
  • Be ready to break out of standards but always keep in mind that there is a reason why these standards have been established. Not all new things are good things ... but you will never know if you don't try new things.
  • If you don't like it chances are others won't like it either.

Hope you enjoyed this post and I hope to hear from your design tips.

Yours truely

Stefan Langer

E34Clock on Github
Creative Commons License

Saturday, October 26, 2013

First obstacles on the journey to android nirvana

If you are able to, develop on the real hardware! Trust me it will save you lots of pain.

I do have a phone but since it is my everyday phone I do not want to test my software while in early alpha state. Besides I'm doing this as a hobbist and not as a professional so my resources are limited and I do not have the money to buy me the devices to test different constellations.

Quit pro quo I have to use the emulator. (If you feel like supporting me feel free to donate or send a device my way ;) ) So I have to resort to the emulator.
I'm developing on a windows as well as on a linux machine. If you have the choice use the linux machine to develope on.  The emulator on windows seems to be very unreliable, at least in my setup. Sometimes it just hangs other times it needs hours, yes hours, to start up. Then from time to time it just starts up and works. Deleting the images doesn't always resolve the problem.

My strongest guess is that this has to do with the limited amount of memory I can allocate for the image running in the emulator on windows, - a meager 768Mb just doesn't cut it -, but this is just a wild guess.

On linux I have not experienced such sluggishness. It is slow but at least it works reliable. The atom emulation doesn't seem to resolve the problem either. - Installing the hardware acceleration from Intel didn't work so I cannot say anything about using it. - Same behaviour. It might be my hardware but a I7 with 4 physical cores and hyperthreading and 16GB should be enough to run an ARM emulator reliably.

So if you use the emulator be patient and bring lots of time with you. If you do not have the time then bring money to buy a device.

Yours truely
Stefan Langer

Creative Commons License

Friday, October 25, 2013

A Mission to Android

Currently I'm very unhappy with my home screen on my android device, a Nexus 4. So I started looking around for new widgets to replace my current clock setup and information widget on the home screen. After searching the play store for proper replacements I just didn't quite find the one that gives me what I want and is not too cost intensive. 
So the natural response was to create my own. This would give me the perfect opportunity to update my rudimentary android experience and get a widget that is customized to my needs.

Creating the widget and blogging about it


After having started into the endeavor and having the first running prototypes on the emulator I got the idea to write about this mission and maybe just maybe somebody else can use this experience to gain some insight into android development and learn a thing or two. 
So here we are: Me writing about how I code this thing and You reading about it!

I hope to regularly blog about this mission and I hope you enjoy reading it and maybe you can give me some tips, criticism and feedback about my widget, the code and this blog.

So bare with me and I hope to see you again. 

Code and Licenses

As this mission evolves I'm going to push my code to github.com. You are welcome to grab the code, fork it, play with it and send me back pull requests. 
If I succeed I might actually publish the resulting widget to the play store. Until then you are on your own to install the widget on your own device. I take no responsibility for any damage or problems the code might cause. 
All graphics are published under a Creative Commons Attribution-ShareAlike 3.0 Unported License. The code is published under a Apache License, Version 2.0.

Resources

E34Clock on Github

The code is licensed under the Apache License, Version 2.0

All image work is additionally licensed under a Creative Commons Attribution-ShareAlike 3.0 Unported License.


Yours truely

Stefan Langer

Creative Commons License